所有 WordPress 主題都附帶強大的 functions.php 檔案。 此檔案作為外掛,可讓您在 WordPress 網站上做很多很酷的事情。 在本文中,我們將向您展示一些 WordPress 功能檔案中最有用的技巧。
什麼是 WordPress 中的函式檔案?
函式檔案通常稱為 functions.php 檔案是 WordPress 主題檔案。 它附帶了所有免費和優質的 WordPress 主題。
該檔案的目的是允許主題開發人員定義主題功能和功能。 該檔案的作用就像一個 WordPress 外掛,可用於在 WordPress 中新增自己的自定義程式碼段。
您會在 WPBeginner 等網站上找到許多這些程式碼片段,其中包含說明,您可以在主題的 functions.php 檔案或特定於站點的 WordPress 外掛中新增此程式碼。
現在你可能會想到一個特定於站點的 WordPress 外掛和 functions.php 檔案有什麼區別? 哪一個更好?
而 functions.php 檔案更方便,一個特定於站點的外掛好多了。 只是因為它獨立於您的 WordPress 主題,無論您使用哪個主題,都可以正常工作。
另一方面,主題的功能檔案只適用於該主題,如果您切換主題,則必須將自定義程式碼複製/貼上到新主題中。
話雖如此,這是 WordPress 功能檔案的一些非常有用的技巧。
1. 刪除 WordPress 版本號
您應該始終使用最新版本的 WordPress 。 但是,您可能仍然想從您的網站中刪除 WordPress 版本號。 只需將此程式碼段新增到您的函式檔案中即可。
function wpb_remove_version() {
return '';
}
add_filter('the_generator', 'wpb_remove_version');
有關詳細說明,請參閱我們的指南,以正確的方式刪除 WordPress 版本號。
2. 新增自定義儀錶板徽標
想白標籤您的 WordPress 管理區? 新增自定義儀錶板徽標是此過程的第一步。
首先,您需要將自定義徽標上傳到您的主題的影像資料夾作為 custom-logo.png 。 確保您的自定義徽標的大小為 16×16 畫素。
之後,您可以將此程式碼新增到主題的函式檔案中。
function wpb_custom_logo() {
echo '
<style type="text/css">
#wpadminbar #wp-admin-bar-wp-logo > .ab-item .ab-icon:before {
background-image: url(' . get_bloginfo('stylesheet_directory') .
'/images/custom-logo.png) !important;
background-position: 0 0;
color:rgba(0, 0, 0, 0);
}
#wpadminbar #wp-admin-bar-wp-logo.hover > .ab-item .ab-icon {
background-position: 0 0;
}
</style>
';
}
//hook into the administrative header output
add_action('wp_before_admin_bar_render', 'wpb_custom_logo');
有關替代方法和更多詳細資訊,請參閱我們的指南,瞭解如何在 WordPress 中新增自定義儀錶板徽標。
3. 在 WordPress 管理面板中更改頁尾
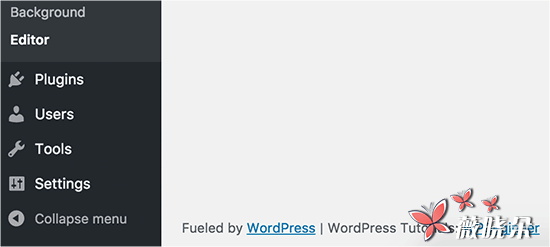
WordPress 管理區域中的頁尾顯示 「感謝您使用 WordPress 建立」 訊息。 您可以透過新增此程式碼將其更改為任何您想要的。
function remove_footer_admin () {

echo 'Fueled by <a href="http://www.wordpress.org" target="_blank">WordPress</a>
| WordPress Tutorials:
<a href="http://www.wpbeginner.com" target="_blank">WPBeginner</a></p>';

}

add_filter('admin_footer_text', 'remove_footer_admin');
隨意更改要新增的文字和連結。 以下是我們測試網站的外觀。
4. 在 WordPress 中新增自定義儀錶板小部件
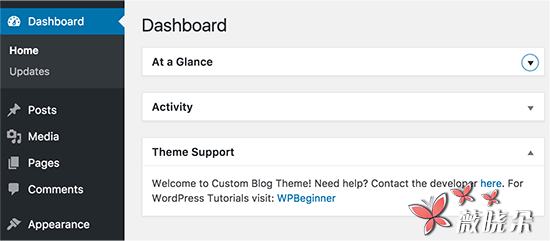
您可能已經看到了許多外掛和主題新增在 WordPress 儀錶板中的小部件。 作為主題開發人員,您可以透過貼上以下程式碼自行新增:
add_action('wp_dashboard_setup', 'my_custom_dashboard_widgets');

function my_custom_dashboard_widgets() {
global $wp_meta_boxes;

wp_add_dashboard_widget('custom_help_widget', 'Theme Support',
'custom_dashboard_help');
}

function custom_dashboard_help() {
echo '<p>Welcome to Custom Blog Theme! Need help? Contact the developer
<a href="mailto:yourusername@gmail.com">here</a>.
For WordPress Tutorials visit:
<a href="http://www.wpbeginner.com" target="_blank">WPBeginner</a></p>';
}
這是它的樣子:
有關詳細資訊,請參閱我們的教程,瞭解如何在 WordPress 中新增自定義儀錶板小部件。
5. 更改 WordPress 中的預設 Gravatar
你在部落格上看過預設的神秘人頭像嗎? 您可以輕鬆地將其替換為您自己的品牌定製化身。 只需上傳您要用作預設頭像的影像,然後將此程式碼新增到您的函式檔案中。
add_filter( 'avatar_defaults', 'wpb_new_gravatar' );
function wpb_new_gravatar ($avatar_defaults) {
$myavatar =
'http://example.com/wp-content/uploads/2017/01/wpb-default-gravatar.png';
$avatar_defaults[$myavatar] = "Default Gravatar";
return $avatar_defaults;
}
現在,您可以轉到 「設定» 討論」 頁面,並選擇您的預設頭像。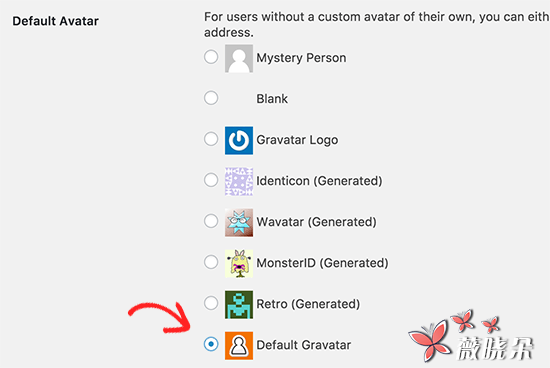
有關詳細說明,請參閱我們的指南,瞭解如何更改 WordPress 中的預設 gravatar 。
6. WordPress 頁尾中的動態版權日期
您可以透過在主題中編輯頁尾模板來新增版權日期。 但是,當您的網站啟動時它不會顯示,明年不會自動更改。
您可以使用此程式碼在 WordPress 頁尾中新增動態版權日期。
function wpb_copyright() {
global $wpdb;
$copyright_dates = $wpdb->get_results("
SELECT
YEAR(min(post_date_gmt)) AS firstdate,
YEAR(max(post_date_gmt)) AS lastdate
FROM
$wpdb->posts
WHERE
post_status = 'publish'
");
$output = '';
if($copyright_dates) {
$copyright = "© " . $copyright_dates[0]->firstdate;
if($copyright_dates[0]->firstdate != $copyright_dates[0]->lastdate) {
$copyright .= '-' . $copyright_dates[0]->lastdate;
}
$output = $copyright;
}
return $output;
}
新增此功能後,您需要開啟您的 footer.php 檔案,並新增以下程式碼,以顯示動態版權日期:
<?php echo wpb_copyright(); ?>
此功能查詢您的第一篇文章的日期以及您上次釋出的日期。 那麼隨之而來的就是你所說的功能。
有關詳細資訊,請參閱我們的指南,瞭解如何在 WordPress 中新增動態版權日期。
7. 隨機更改 WordPress 中的背景顏色
您是否要在每次訪問和頁面重新載入時隨機更改 WordPress 上的背景顏色? 這是如何輕鬆做到這一點。
首先,您需要將此程式碼新增到主題的函式檔案中。
function wpb_bg() {
$rand = array('0', '1', '2', '3', '4', '5', '6',
'7', '8', '9', 'a', 'b', 'c', 'd', 'e', 'f');
$color ='#'.$rand[rand(0,15)].$rand[rand(0,15)].$rand[rand(0,15)].
$rand[rand(0,15)].$rand[rand(0,15)].$rand[rand(0,15)];
echo $color;
}
接下來,您需要在主題中編輯 header.php 檔案。 找到<body> 標籤,並新增替換為此行:
<body <?php body_class(); ?> style="background-color:<?php wpb_bg();?>">>
您現在可以儲存更改並訪問您的網站以檢視此操作。
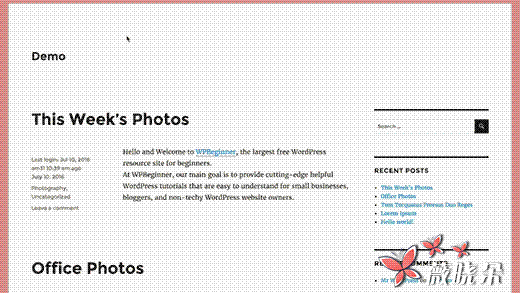
有關更多詳細資訊和替代方法,請參閱我們的教程,瞭解如何在 WordPress 中隨機更改背景顏色。
8. 更新 WordPress URL
如果您的 WordPress 登入頁面保持重新整理或您無法訪問管理區域,則需要更新 WordPress URL 。
一種方法是使用 wp-config.php 檔案。 但是,如果這樣做,您將無法在設定頁面上設定正確的地址。 WordPress URL 和站點 URL 欄位將被鎖定和不可編輯。
如果你想解決這個問題,那麼你應該把這個程式碼新增到你的函式檔案中。
update_option( 'siteurl', 'http://example.com' );
update_option( 'home', 'http://example.com' );
不要忘記用你自己的域名替換 example.com 。
登入後,您可以轉到 「設定」 並在其中設定 URL 。 之後,您應該刪除您新增到功能檔案的程式碼,否則將在您訪問網站時不斷更新這些 URL 。
9. 在 WordPress 中新增其他影像大小
當您上傳影像時,WordPress 會自動建立多個影像大小。 您還可以建立其他影像大小以在主題中使用。 新增這個程式碼你的主題的功能檔案。
add_image_size( 'sidebar-thumb', 120, 120, true ); // Hard Crop Mode
add_image_size( 'homepage-thumb', 220, 180 ); // Soft Crop Mode
add_image_size( 'singlepost-thumb', 590, 9999 ); // Unlimited Height Mode
此程式碼建立三種不同大小的新影像大小。 隨意調整程式碼以滿足您的要求。
您可以使用此程式碼在主題的任何位置顯示影像大小。
<?php the_post_thumbnail( 'homepage-thumb' ); ?>
有關詳細說明,請參閱我們的指南,瞭解如何在 WordPress 中建立其他影像大小。
10. 為您的主題新增新的導航選單
WordPress 允許主題開發人員定義導航選單,然後顯示它們。 在您的主題功能檔案中新增此程式碼,以在主題中定義新的選單位置。
function wpb_custom_new_menu() {
  register_nav_menu('my-custom-menu',__( 'My Custom Menu' ));
}
add_action( 'init', 'wpb_custom_new_menu' );
現在,您可以前往 Appearance» 選單,您將看到 「我的自定義選單」 作為主題位置選項。
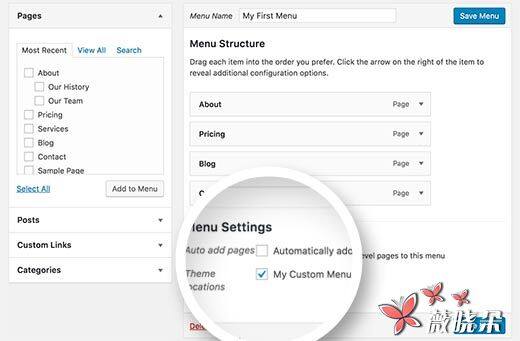
現在,您需要將此程式碼新增到要顯示導航選單的主題中。
<?php
wp_nav_menu( array(
    'theme_location' => 'my-custom-menu',
    'container_class' => 'custom-menu-class' ) );
?>
有關詳細說明,請參閱我們的指南,瞭解如何在 WordPress 主題中新增自定義導航選單。
11. 新增作者資料欄位
您是否要在 WordPress 的作者資料中新增額外的欄位? 您可以透過將此程式碼新增到您的函式檔案中來輕鬆實現:
function wpb_new_contactmethods( $contactmethods ) {
// Add Twitter
$contactmethods['twitter'] = 'Twitter';
//add Facebook
$contactmethods['facebook'] = 'Facebook';

return $contactmethods;
}
add_filter('user_contactmethods','wpb_new_contactmethods',10,1);
該程式碼將新增 Twitter 和 Facebook 欄位到 WordPress 的使用者配置檔案。
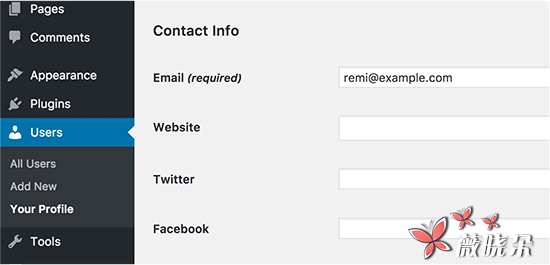
您現在可以在您的作者模板中顯示這些欄位,如下所示:
<?php echo $curauth->twitter; ?>
您可能還想看到我們的指南,瞭解如何在 WordPress 註冊中新增其他使用者配置檔案欄位。
12. 在 WordPress 主題中新增小部件就緒區域或邊欄
這是最常用的一個,許多開發人員已經知道了這一點。 但是,對於那些不瞭解的人來說,這是值得的。 將以下程式碼貼上到 functions.php 檔案中:
// Register Sidebars
function custom_sidebars() {

	$args = array(
		'id'            => 'custom_sidebar',
		'name'          => __( 'Custom Widget Area', 'text_domain' ),
		'description'   => __( 'A custom widget area', 'text_domain' ),
		'before_title'  => '<h3 class="widget-title">',
		'after_title'   => '</h3>',
		'before_widget' => '<aside id="%1$s" class="widget %2$s">',
		'after_widget'  => '</aside>',
	);
	register_sidebar( $args );

}
add_action( 'widgets_init', 'custom_sidebars' );
您現在可以訪問外觀» 視窗小部件頁面,您將看到您的新的自定義視窗小部件區域。
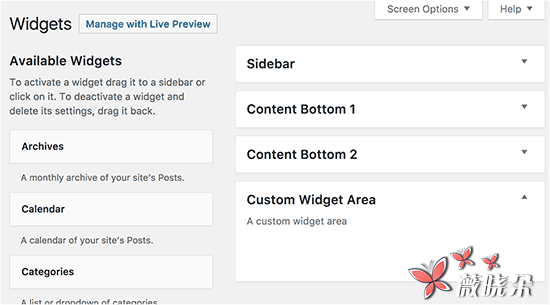
要在主題中顯示此側邊欄或小部件就緒區域,請新增以下程式碼:
<?php if ( !function_exists('dynamic_sidebar')
|| !dynamic_sidebar('custom_sidebar') ) : ?>
<!–Default sidebar info goes here–>
<?php endif; ?>
有關更多詳細資訊,請參閱我們的指南,瞭解如何在 WordPress 中新增動態小部件就緒區域和側邊欄。
操縱 RSS Feed 頁尾
您是否看過在每個帖子下方的 RSS Feed 中新增他們的廣告的部落格。 您可以使用簡單的功能輕鬆實現。 貼上以下程式碼:
function wpbeginner_postrss($content) {
if(is_feed()){
$content = 'This post was written by Syed Balkhi '.$content.'Check out WPBeginner';
}
return $content;
}
add_filter('the_excerpt_rss', 'wpbeginner_postrss');
add_filter('the_content', 'wpbeginner_postrss');
有關更多資訊,請參閱我們的如何新增內容並完全操縱您的 RSS 源的指南。
14. 將精選圖片新增到 RSS Feeds
帖子縮圖或特色圖片通常只顯示在您的網站設計中。 您可以在 RSS Feed 中使用簡單的功能輕鬆地將該功能擴充套件到您的 RSS Feed 。
function rss_post_thumbnail($content) {
global $post;
if(has_post_thumbnail($post->ID)) {
$content = '<p>' . get_the_post_thumbnail($post->ID) .
'</p>' . get_the_content();
}
return $content;
}
add_filter('the_excerpt_rss', 'rss_post_thumbnail');
add_filter('the_content_feed', 'rss_post_thumbnail');
有關更多詳細資訊,請參閱我們的指南,瞭解如何將帖子縮圖新增到您的 WordPress RSS Feed 中。
15. 隱藏 WordPress 中的登入錯誤
駭客們可以使用 WordPress 中的登入錯誤來猜測他們是否輸入錯誤的使用者名稱或密碼。 透過在 WordPress 中隱藏登入錯誤,您可以使登入區域更加安全。
function no_wordpress_errors(){
  return 'Something is wrong!';
}
add_filter( 'login_errors', 'no_wordpress_errors' );
現在,當使用者輸入不正確的使用者名稱或密碼時,使用者會看到一般的訊息。
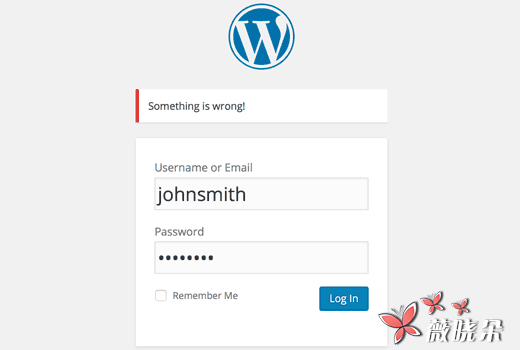
有關更多資訊,請參閱我們的教程,瞭解如何在 WordPress 登入錯誤訊息中停用登入提示。
16. 停用 WordPress 中的電子郵件登入
WordPress 允許使用者使用使用者名稱或電子郵件地址進行登入。 您可以透過將該程式碼新增到您的函式檔案中,輕鬆地透過 WordPress 中的電子郵件進行登入。
remove_filter( 'authenticate', 'wp_authenticate_email_password', 20 );
有關更多資訊,請參閱我們的指南,瞭解如何透過 WordPress 中的電子郵件功能停用登入。
17. 停用 WordPress 中的搜尋功能
如果要停用 WordPress 網站上的搜尋功能,只需將此程式碼新增到您的函式檔案中即可。
function fb_filter_query( $query, $error = true ) {

if ( is_search() ) {
$query->is_search = false;
$query->query_vars[s] = false;
$query->query[s] = false;

// to error
if ( $error == true )
$query->is_404 = true;
}
}

add_action( 'parse_query', 'fb_filter_query' );
add_filter( 'get_search_form', create_function( '$a', "return null;" ) );
有關詳細資訊,請參閱我們的教程,瞭解如何停用 WordPress 中的搜尋功能。
18. 延遲 RSS Feed 中的帖子
有時候,您的文章中可能會出現語法錯誤或拼寫錯誤。 這個錯誤就會生效,並被分發給你的 RSS 訂閱者。 如果您的 WordPress 部落格上有電子郵件訂閱,那麼這些訂閱者也可以獲得。
只需將該程式碼新增到主題的函式檔案中即可。
function publish_later_on_feed($where) {

	global $wpdb;

	if ( is_feed() ) {
		// timestamp in WP-format
		$now = gmdate('Y-m-d H:i:s');

		// value for wait; + device
		$wait = '10'; // integer
// http://dev.mysql.com/doc/refman/5.0/en/date-and-time-functions.html
#function_timestampdiff
		$device = 'MINUTE'; //MINUTE, HOUR, DAY, WEEK, MONTH, YEAR

		// add SQL-sytax to default $where
		$where .= "
AND TIMESTAMPDIFF($device, $wpdb->posts.post_date_gmt, '$now') > $wait ";
	}
	return $where;
}

add_filter('posts_where', 'publish_later_on_feed');
在這段程式碼中,我們使用 10 分鐘作為 $ wait 或延遲時間。 隨意將其更改為任意數分鐘。
有關外掛方法和更多資訊,請參閱我們的詳細指南,瞭解如何延遲 WordPress RSS Feed 中出現的帖子。
19. 更改閱讀 WordPress 中摘錄的更多文字
你想改變摘錄後出現的文字嗎? 只需將該程式碼新增到主題的函式檔案中即可。
function modify_read_more_link() {
    return '<a class="more-link" href="' .
get_permalink() . '">Your Read More Link Text</a>';
}
add_filter( 'the_content_more_link', 'modify_read_more_link' );
20. 停用 WordPress 中的 RSS 源
並非所有網站都需要 RSS 源。 如果要在 WordPress 網站上停用 RSS 提要,請將此程式碼新增到主題的函式檔案中。
function fb_disable_feed() {
wp_die( __('No feed available,please visit our <a href="'.
get_bloginfo('url') .'">homepage</a>!') );
}

add_action('do_feed', 'fb_disable_feed', 1);
add_action('do_feed_rdf', 'fb_disable_feed', 1);
add_action('do_feed_rss', 'fb_disable_feed', 1);
add_action('do_feed_rss2', 'fb_disable_feed', 1);
add_action('do_feed_atom', 'fb_disable_feed', 1);
有關外掛方法和更多資訊,請參閱我們的指南,瞭解如何在 WordPress 中停用 RSS 源。
21. 在 WordPress 中更改摘錄長度
WordPress 將節選時間限制為 55 個字。 如果需要更改,那麼可以將此程式碼新增到函式檔案中。
functionnew_excerpt_length($length) {
return 100;
}
add_filter('excerpt_length', 'new_excerpt_length');
將 100 更改為要在節選中顯示的單詞數。
對於替代方法,您可能需要檢視我們的如何自定義 WordPress 摘錄 (無需編碼) 的指南。
22. 在 WordPress 中新增管理員使用者
如果您忘記了 WordPress 密碼和電子郵件,則可以使用 FTP 客戶端將此程式碼新增到主題的功能檔案中來新增管理員使用者。
function wpb_admin_account(){
$user = 'Username';
$pass = 'Password';
$email = 'email@domain.com';
if ( !username_exists( $user )  && !email_exists( $email ) ) {
$user_id = wp_create_user( $user, $pass, $email );
$user = new WP_User( $user_id );
$user->set_role( 'administrator' );
} }
add_action('init','wpb_admin_account');
不要忘記填寫使用者名稱,密碼和電子郵件欄位。 一旦您登入到 WordPress 網站,不要忘記從您的函式檔案中刪除程式碼。
有關此主題的更多資訊,請參閱我們的教程,瞭解如何使用 FTP 在 WordPress 中新增管理員使用者。
23. 從 WordPress 儀錶板中刪除歡迎面板
歡迎面板是新增到 WordPress 管理區的儀錶板螢幕的元框。 它為初學者在他們的新 WordPress 網站上做事情提供了有用的捷徑。
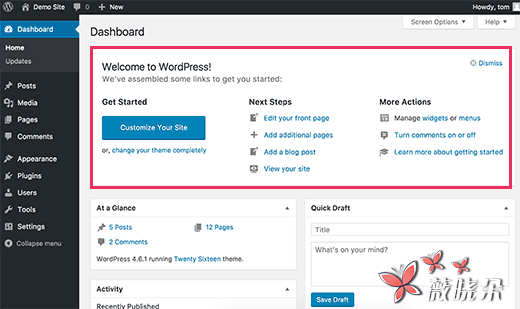
您可以透過在函式檔案中新增此程式碼來輕鬆隱藏。
remove_action('welcome_panel', 'wp_welcome_panel');
有關其他方法和更多詳細資訊,請參閱我們的指南,瞭解如何在 WordPress 儀錶板中刪除歡迎面板。
24. 在 WordPress 中顯示註冊使用者總數
您想在 WordPress 網站上顯示註冊使用者總數嗎? 只需將該程式碼新增到主題的函式檔案中即可。
// Function to return user count
function wpb_user_count() {
$usercount = count_users();
$result = $usercount['total_users'];
return $result;
}
// Creating a shortcode to display user count
add_shortcode('user_count', 'wpb_user_count');
此程式碼建立一個短程式碼,允許您顯示您網站上註冊使用者的總數。 現在,您只需要將此短程式碼新增到 [user_count] 您要顯示使用者總數的帖子或頁面。
有關更多資訊和外掛方法,請參閱我們的教程,瞭解如何在 WordPress 中顯示註冊使用者總數。
25. 從 RSS 源排除特定類別
您是否要從 WordPress RSS Feed 排除特定類別? 將此程式碼新增到主題的函式檔案中。
function exclude_category($query) {
	if ( $query->is_feed ) {
		$query->set('cat', '-5, -2, -3');
	}
return $query;
}
add_filter('pre_get_posts', 'exclude_category');
26. 在文字視窗小部件中啟用短程式碼執行
預設情況下,WordPress 不會在文字視窗小部件內執行快捷方式。 要解決這個問題,您只需將此程式碼新增到主題的函式檔案中即可。
// Enable shortcodes in text widgets
add_filter('widget_text','do_shortcode');
有關替代方法和更多資訊,請參閱我們的指南,瞭解如何在 WordPress 側邊欄小部件中使用短碼。
27. 將偶數和偶數 CSS 類新增到 WordPress 帖子
您可能已經看到 WordPress 主題使用舊的或甚至類的 WordPress 評論。 它可以幫助使用者視覺化一個評論結束的地方,下一個開始。
您可以使用相同的技術為您的 WordPress 帖子。 它看起來美觀,幫助使用者快速掃描具有大量內容的頁面。 只需將該程式碼新增到主題的函式檔案中即可。
function oddeven_post_class ( $classes ) {
   global $current_class;
   $classes = $current_class;
   $current_class = ($current_class == 'odd') ? 'even' : 'odd';
   return $classes;
}
add_filter ( 'post_class' , 'oddeven_post_class' );
global $current_class;
$current_class = 'odd';
這個程式碼簡單地新增了一個奇怪或甚至類 WordPress 的帖子。 您現在可以新增自定義 CSS 以使其風格不同。 這是一個幫助您開始的示例程式碼。
.even {
background:#f0f8ff;
}
.odd {
 background:#f4f4fb;
}
最終結果將如下所示:
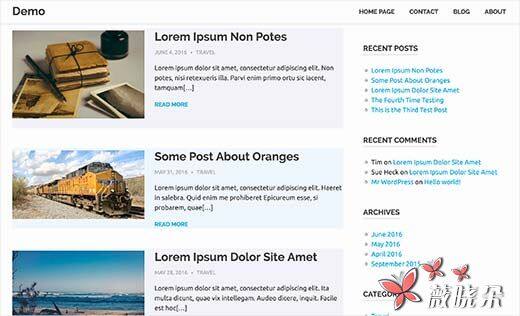
需要更詳細的說明? 看看我們的教程,關於如何在 WordPress 主題中新增奇/偶類的帖子。
28. 新增要在 WordPress 中上傳的其他檔案型別
預設情況下,WordPress 允許您上傳有限數量的最常用的檔案型別。 但是,您可以擴充套件它以允許其他檔案型別。 將此程式碼新增到您的主題的函式檔案中:
function my_myme_types($mime_types){
    $mime_types['svg'] = 'image/svg+xml'; //Adding svg extension
    $mime_types['psd'] = 'image/vnd.adobe.photoshop'; //Adding photoshop files
    return $mime_types;
}
add_filter('upload_mimes', 'my_myme_types', 1, 1);
此程式碼允許您將 SVG 和 PSD 檔案上傳到 WordPress 。 您需要 Google 才能找到要允許的檔案型別的 MIME 型別,然後在程式碼中使用它們。
有關此主題的更多資訊,請參閱我們的教程,瞭解如何新增要在 WordPress 中上傳的其他檔案型別。
29. 刪除 WordPress 中的預設影像連結
預設情況下,當您在 WordPress 中上傳影像時,會自動連結到影像檔案或附件頁面。 如果使用者點選影像,他們將被帶到您的帖子的新頁面。
這是您如何輕鬆地停止 WordPress 自動連結影像上傳。 所有你需要做的是將這個程式碼片段新增到你的函式檔案中:
function wpb_imagelink_setup() {
	$image_set = get_option( 'image_default_link_type' );

	if ($image_set !== 'none') {
		update_option('image_default_link_type', 'none');
	}
}
add_action('admin_init', 'wpb_imagelink_setup', 10);
現在當您在 WordPress 中上傳新影像時,不會自動連結。 如果需要,您仍然可以連結到檔案或附件頁面。
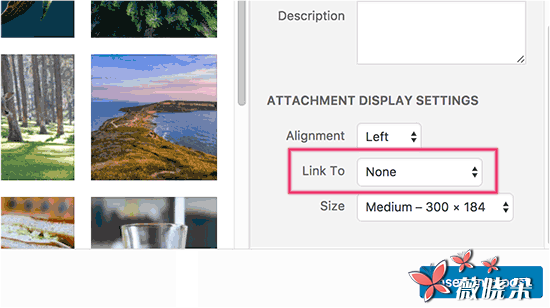
您可能需要檢視我們的教程,瞭解如何刪除 WordPress 中的預設影像連結以獲得替代外掛方法和更多資訊。
30. 在 WordPress 的帖子中新增一個作者資訊框
如果您執行多作者網站,並希望在帖子結尾顯示作者 bios,那麼您可以嘗試此方法。 首先將此程式碼新增到您的函式檔案中:
function wpb_author_info_box( $content ) {

global $post;

// Detect if it is a single post with a post author
if ( is_single() && isset( $post->post_author ) ) {

// Get author's display name
$display_name = get_the_author_meta( 'display_name', $post->post_author );

// If display name is not available then use nickname as display name
if ( empty( $display_name ) )
$display_name = get_the_author_meta( 'nickname', $post->post_author );

// Get author's biographical information or description
$user_description = get_the_author_meta( 'user_description', $post->post_author );

// Get author's website URL
$user_website = get_the_author_meta('url', $post->post_author);

// Get link to the author archive page
$user_posts = get_author_posts_url( get_the_author_meta( 'ID' ,
$post->post_author));

if ( ! empty( $display_name ) )

$author_details = '<p class="author_name">About ' . $display_name . '</p>';

if ( ! empty( $user_description ) )
// Author avatar and bio

$author_details .= '<p class="author_details">' .
get_avatar( get_the_author_meta('user_email') , 90 ) .
nl2br( $user_description ). '</p>';

$author_details .= '<p class="author_links"><a href="'.
$user_posts .'">View all posts by ' . $display_name . '</a>';

// Check if author has a website in their profile
if ( ! empty( $user_website ) ) {

// Display author website link
$author_details .= ' | <a href="'%20.%20$user_website%20.'"
target="_blank" rel="nofollow">Website</a></p>';

} else {
// if there is no author website then just close the paragraph
$author_details .= '</p>';
}

// Pass all this info to post content
$content = $content . '<footer class="author_bio_section" >' .
$author_details . '</footer>';
}
return $content;
}

// Add our function to the post content filter
add_action( 'the_content', 'wpb_author_info_box' );

// Allow HTML in author bio section
remove_filter('pre_user_description', 'wp_filter_kses');
接下來,您將需要新增一些自定義 CSS 以使其看起來更好。 您可以使用此樣本 CSS 作為起點。
.author_bio_section{
background: none repeat scroll 0 0 #F5F5F5;
padding: 15px;
border: 1px solid #ccc;
}

.author_name{
font-size:16px;
font-weight: bold;
}

.author_details img {
border: 1px solid #D8D8D8;
border-radius: 50%;
float: left;
margin: 0 10px 10px 0;
}
這是你的作者框如何看起來像:

有關外掛方法和更詳細的說明,請檢視我們的文章,瞭解如何在 WordPress 的帖子中新增作者資訊框。
31. 停用 WordPress 中的 XML-RPC
XML-RPC 是允許第三方應用程式遠端與您的 WordPress 站點通訊的方法。 這可能會導致安全問題,可以被駭客利用。
只需將此程式碼新增到您的函式檔案中即可關閉 WordPress 中的 XML-RPC:
add_filter('xmlrpc_enabled', '__return_false');
您可能需要閱讀我們關於如何在 WordPress 中停用 XML-RPC 的文章以獲取更多資訊。
32. 將精選圖片自動連結到帖子
如果您的 WordPress 主題不會自動將精選影像連結到完整的文章,那麼您可以嘗試此方法。 只需將該程式碼新增到主題的函式檔案中即可。
function wpb_autolink_featured_images( $html, $post_id, $post_image_id ) {

If (! is_singular()) {

$html = '<a href="'%20.%20get_permalink(%20$post_id%20)%20.%20'" title="' .
esc_attr( get_the_title( $post_id ) ) . '">' . $html . '</a>';
return $html;

} else {

return $html;

}

}
add_filter( 'post_thumbnail_html', 'wpb_autolink_featured_images', 10, 3 );
您可能想閱讀我們的文章,瞭解如何自動將精選影像連結到 WordPress 中的帖子。
目前為止就這樣了。
我們希望這篇文章幫助您學習 WordPress 中的 functions.php 檔案的一些新的有用的技巧。 您也可能希望看到我們提高 WordPress 速度和效能的最終指南。

